Return To Blog
After Google SketchUp: Making of the end table PART 1 (choosing lumber)
May 30, 2012
Let the great box-making project begin!  You remember the box I am talking about, right? ...The one that will soon be sitting next to my bed with a lamp and alarm clock on it. Well, I think I've successfully wrangled Harlan into helping me complete this project (and it didn't even require bribery). Having a mentor and a picture of my end product is the starting point. As I said, I am a complete novice and really don't know where to begin but I am great at asking questions and taking directions :)
Â
Step 1: Determining the type of lumber I want to use
This is an easy one- walnut! I have always loved the look of walnut and even though the SketchUp rendering was done in cherry, I really have envisioned a darker wood with brushed silver or brass hardware. Â
Step 2: Determining how much lumber I will need for my project
This should be easy, right? Maybe not, as I learned.
Take a look at the diagram that I sketched up (by hand) to illustrate calculating board footage. I focused first on the box, ignoring the drawer front and the back panel. At this point, I still hadn't decided if I would use solid wood or plywood for the back panel (more about that later...).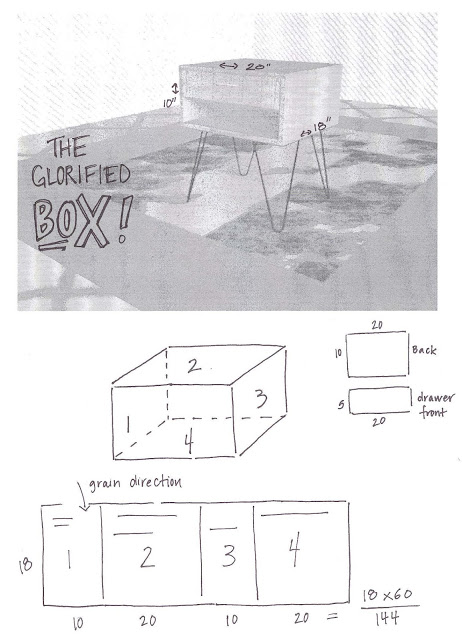
what a beautiful sight
Â
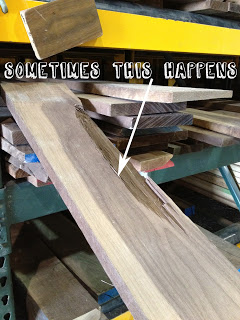
Or you may notice something like this:Â
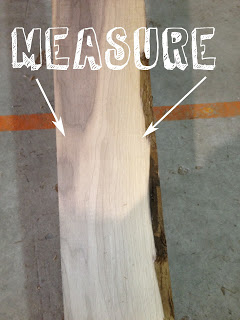
Of course, we always strive to provide the best quality lumber to our customers but these things sometimes "just happen". This is typical in the lumber industry so just be prepared to dig around a little bit. However, keep in mind that a board like this can still be used. For example, you can cut out the portion of the board that is flawed and still use the material that is around it. For critical width dimensions, be sure that you measure your pieces at the point where the board will be the smallest...
Â
Step 4: Check your measurements
We all know the age-old adage: measure twice, cut once... So, to be sure that I had the correct amount of material I used a white crayon to mark where I would make my cuts on the boards that I had chosen. Success. I ended up with two boards totaling 16 board feet that will yield three pieces at 6.5" x 62", with a considerable amount of wood left over that will make the back panel and drawer front.
To be continued...
Â
Our first lesson: Wax on, Wax off
Step 1: Determining the type of lumber I want to use
This is an easy one- walnut! I have always loved the look of walnut and even though the SketchUp rendering was done in cherry, I really have envisioned a darker wood with brushed silver or brass hardware. Â
Step 2: Determining how much lumber I will need for my project
This should be easy, right? Maybe not, as I learned.
Take a look at the diagram that I sketched up (by hand) to illustrate calculating board footage. I focused first on the box, ignoring the drawer front and the back panel. At this point, I still hadn't decided if I would use solid wood or plywood for the back panel (more about that later...).
I am a visual learner, so drawing this sort of diagram was a beneficial way for me to calculate roughly the amount of lumber I would be looking for to construct the box. The dimensions of the box are 18" x 60", so I will be using 7.5 board feet of 4/4 walnut. Of course, when calculating board footage you need to account for the waste factor. As I have learned, accounting for waste factor will depend on the wood you are using; species and condition (it can range from an additional 10-30%). Because I am using walnut and don't want to use any pieces with sapwood I calculated an additional 30%, or around 10 board feet total.
Step 3: Picking out the lumber
With this drawing in hand I went out to inspect our stock of 4/4 walnut with Harlan. We decided that the best plan of action would be to find boards that would net at least 6.5" x 62". This represents approximately one third of the width (18") and the entire length (60"), meaning I would need to find at least three boards that can be glued up to make the four pieces of the box.
Am I making sense here?  Good!Â
what a beautiful sight
Step 3a: Have fun sorting through lumber!
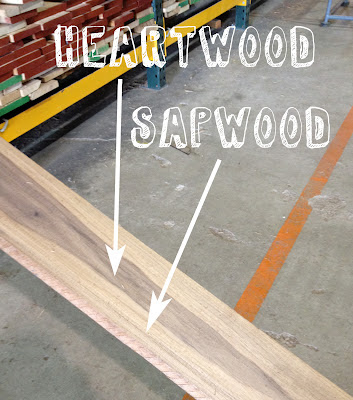
It's important to have a good idea of your application when selecting your lumber. I will just say that while I like sapwood, I decided that for this project I wanted to avoid it. The bedside table is fairly small and I thought that having too much variance in the wood might be distracting to the eye. That said, sapwood is a naturally occurring characteristic of walnut and selecting for only heartwood makes for a decidedly harder process (also more expensive, more waste product). But I want my first project to turn out just as I have envisioned, so a girl has to be willing to dig through a whole bin of walnut (and brave splinters to boot).
It's important to have a good idea of your application when selecting your lumber. I will just say that while I like sapwood, I decided that for this project I wanted to avoid it. The bedside table is fairly small and I thought that having too much variance in the wood might be distracting to the eye. That said, sapwood is a naturally occurring characteristic of walnut and selecting for only heartwood makes for a decidedly harder process (also more expensive, more waste product). But I want my first project to turn out just as I have envisioned, so a girl has to be willing to dig through a whole bin of walnut (and brave splinters to boot).
Â
 *Helpful tips when selecting lumber
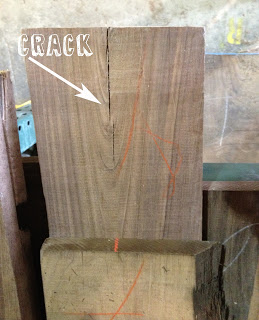
When you measure, make sure you are inspecting the board (both sides). You may need to take into account small flaws in the lumber like end splits at the end of the board...
When you measure, make sure you are inspecting the board (both sides). You may need to take into account small flaws in the lumber like end splits at the end of the board...
Or you may notice something like this:Â
Of course, we always strive to provide the best quality lumber to our customers but these things sometimes "just happen". This is typical in the lumber industry so just be prepared to dig around a little bit. However, keep in mind that a board like this can still be used. For example, you can cut out the portion of the board that is flawed and still use the material that is around it. For critical width dimensions, be sure that you measure your pieces at the point where the board will be the smallest...
Â
Step 4: Check your measurements
We all know the age-old adage: measure twice, cut once... So, to be sure that I had the correct amount of material I used a white crayon to mark where I would make my cuts on the boards that I had chosen. Success. I ended up with two boards totaling 16 board feet that will yield three pieces at 6.5" x 62", with a considerable amount of wood left over that will make the back panel and drawer front.
To be continued...