Return To Blog
Google SketchUp: a great (free) investment for furniture design
May 24, 2012
One of the greatest things about working for Sears Trostel and talking to woodworkers all day long is the plethora of knowledgeable craftsmen I have at my disposal.
So, yesterday I started playing around with design ideas for a modern stream-lined nightstand (which could easily double as a living room end table). I am a complete novice at furniture design (and woodworking) but I know what I like, and that is a mid-century modern design.
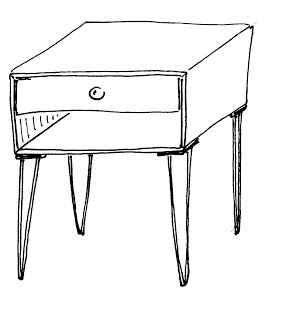
With that in mind, I started talking to Harlan who is the resident woodworking guru and class instructor at Sears Trostel. I began with a vision, worked out rough dimensions and then sketched this out by hand:
Clean lines make me happy :)
Pretty basic, but you get the idea. Yep, it's a glorified box with a drawer and hairpin legs (I am obsessed with hairpin legs). Â
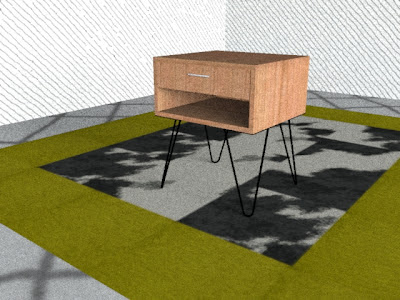
I had this drawing sitting up at the front counter when I was helping a customer and he remarked, "Gee, looks like someone draws about as well as I do. That's why I use Google SketchUp." Laughter ensued. Obviously, I didn't take offense with this comment but realized he was probably on to something. So, this morning Meryl sat down with me and turned my sketch into this:
Â

Rendering 1 in cherry
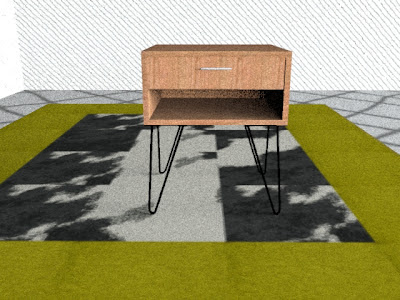
And this too:

Rendering 2 in cherry
Â
.JPG)
The cardboard box "box"
So, yesterday I started playing around with design ideas for a modern stream-lined nightstand (which could easily double as a living room end table). I am a complete novice at furniture design (and woodworking) but I know what I like, and that is a mid-century modern design.
With that in mind, I started talking to Harlan who is the resident woodworking guru and class instructor at Sears Trostel. I began with a vision, worked out rough dimensions and then sketched this out by hand:

Clean lines make me happy :)
Pretty basic, but you get the idea. Yep, it's a glorified box with a drawer and hairpin legs (I am obsessed with hairpin legs). Â
I had this drawing sitting up at the front counter when I was helping a customer and he remarked, "Gee, looks like someone draws about as well as I do. That's why I use Google SketchUp." Laughter ensued. Obviously, I didn't take offense with this comment but realized he was probably on to something. So, this morning Meryl sat down with me and turned my sketch into this:
Â

Rendering 1 in cherry
And this too:

Rendering 2 in cherry
Â
Meryl has a degree in interior design and loads of experience with SketchUp and Revit, so it was a really simple and painless process for her to build a 3D model of my end table design. An hour later, I now know the basics of how to use Google SketchUp and have a rendering that (hopefully) won't be laughed at by customers. The program is so easy to use, you may want to download it and play around with your own design ideas. Click here to download a free version. There are a lot of tutorials out there on the web too- this is Meryl's favorite online tutorial website (she is a self-taught expert).
After having made the 3D rendering I decided it was probably a good idea to make a to-scale model out of corrugated cardboard and some hard maple turning blocks we keep in stock in the warehouse. Remember, I am a complete novice at furniture design... In order to fully visualize the end product I need to see the end product, and scavenged cardboard and packaging tape was the easiest route for me. Having seen what the end table would look like (keeping in mind the maple blocks are not the correct height) I was able to make some needed tweaks to the design before making the real product out of wood (I am thinking walnut). Â
After having made the 3D rendering I decided it was probably a good idea to make a to-scale model out of corrugated cardboard and some hard maple turning blocks we keep in stock in the warehouse. Remember, I am a complete novice at furniture design... In order to fully visualize the end product I need to see the end product, and scavenged cardboard and packaging tape was the easiest route for me. Having seen what the end table would look like (keeping in mind the maple blocks are not the correct height) I was able to make some needed tweaks to the design before making the real product out of wood (I am thinking walnut). Â
.JPG)
The cardboard box "box"
I have enlisted Harlan in this project... he just doesn't know it yet ;)